BrainScope Customer Portal

Tools and guidance for using BrainScope

Training Videos

Get familiar with BrainScope prior to your site implementation—refer back as often as you like to refresh your knowledge!

Access videos here

Operator Guide

Get steps, tips and troubleshooting for working with the BrainScope device. 

Access guide here

Resources

Get resources for patient selection, clinician and patient education, and community awareness.

Access resources here


BrainScope Academy Logo-1

Access all product training and earn free credit hours at BrainScope Academy!

Training Videos

1. Introduction to BrainScope


2. Prepping the Patient


3. Applying the Headset


4. Obtaining Acceptable Impedance Levels


Operator Guide

1. Power on and login

• Press the green button on the right side

• Locate and tap on your name in the Operator List

• If not listed, tap on Start Here to add yourself


2. Select a device assessment pathway

Tap on:

• mTBI Triage for assessments within 72 hours of injury (if configured on the device)

• Concussion Assessment and Patient Management to access all assessments on the device or to export patient reports


3. Enter patient, injury, and symptom details

• Enter patient information

• Enter specific injury information

• Follow the prompts for clinical assessment questions—accuracy is critical

• Note whether the question refers to "Any time since Injury" or "At this time"

• Carefully review information entered for accuracy and modify as needed


Tips & Troubleshooting

• Be sure to correctly enter the patient’s date of birth and confirm their age for an accurate assessment
4. Patient prep—clean forehead

• Unpack electrode headset. Locate alcohol wipes, skin prep pad, and gel tube

• Let the patient know what to expect and give them the patient card to review

• Tap on Start EEG or Proceed depending on device model

• Follow on-screen prep instructions

• Use alcohol wipe to clean forehead, temples, and front of earlobes

• Remove dirt, oil and makeup


Tips & Troubleshooting

• Remember to remove earrings and keep clear of hair

• Use additional wipes if patient has excess makeup or dirt


5. Patient prep—apply gel to skin

• Locate skin prep pad and gel pad

• Disperse 3/4 inch line of gel on to prep pad

• Fold pad in half to spread gel evenly over pad 

• Hold patient’s head for support with one hand and hold skin prep pad with two fingers of the other hand to evenly spread a thin layer of gel on skin in each of the following four areas:

1. Center of forehead from hairline to bridge of nose

2. Across forehead just above eyebrows 

3. Temples from just above edge of eyebrow to corner of eye

4. Front of each earlobe by gently pulling earlobe and placing finger behind lobe for support


Tips & Troubleshooting

• Notify patient the gel will feel cold and wet when applied   

• Swipe evenly in each of the four areas

• Disperse a small amount of additional gel if needed (if pad is dry) 

• NOTE: If gel is not available, refer to section 3.5 in the user manual for skin preparation via exfoliation

6. Apply headset to patient

• Use on screen instructions to guide correct electrode position and application

• Align C1 electrode to be just below hairline—align bottom of tab to bridge of nose

• Remove cover backing from both C1 and C2 Electrodes and apply with firm pressure to center of forehead

• Hook headset over the ears

• Apply R1 and L1 electrodes—bottom of arrow tab must be above and out of the eyebrow

• Apply R2 and L2 at corner of eye within headset guide rails

• Gently pull earlobe to apply R3 and L3 with each tab bent back and pinched

• Insert headset connector level and straight into Data Acquisition Board (DAB) until resistance is met


Tips & Troubleshooting

• Avoid hair under electrode

• Use firm pressure to apply electrodes

• Maintain symmetry of electrode placement from left side to right side

7. Electrode impedance check

• Apply firm pressure to each electrode to get all green

• Correct remaining RED electrodes:

  1. Use tab to lift electrode off skin
  2. Swipe area with prep pad to disperse a small amount of gel
  3. Re-apply electrode to skin
• Proceed with collecting EEG when all electrodes are green


Tips & Troubleshooting

• For C1: Disconnect headset from DAB, pull down to remove from skin, re-prep skin, re-apply, connect headset

• C2 is always GREY

• Press firmly to correct RED electrodes with values close to 10

• Reinsert headset into DAB and re-exfoliate C2 if all RED electrodes

8. Coach the patient

Coach the patient to:

• Get into relaxed and comfortable position

• Relax jaw, facial, and neck muscles

• Close eyes and gently place fingers on inner and outer corners of eyes

• Take a deep breath

• Remain still during the test


Tips & Troubleshooting

• Ask the patient to lie back at a 45% angle in a comfortable position

• Support the patient's head and neck

No meditation or sleep during collection

9. Collect EEG

• Tap on Start Recording to access the EEG collection Dashboard

• Watch for:

1. Flashing orange to indicate artifacts detected

2. No progression of blue bar in center of "EEG Collection Status Window" 

Eye Artifact: Instruct patient to lightly place fingers on inner and outer corners of eye

Muscle Tension: Confirm patient is still and in relaxed position with relaxed jaw, neck, and shoulders—reposition if artifacts continue


Tips and Troubleshooting

• Pause device to provide instructions or reposition patient—tap on center timer button, then tap recording off, reverse steps to start

• Confirm the bottom arrow tab of the R1 and L1 electrodes is above and not touching the eyebrow

• Confirm the patient is not making any facial expressions and facial muscles are relaxed

• Provide words of encouragement and status to patient as session progresses

• Red ‘X' in lower right-hand corner indicates one or more loose electrodes—tap on red X to identify loose electrode and press firmly to reaffix

• Insufficient data result appears if not enough data has been collected in 10 minutes due to artifacts—mitigate artifacts and restart EEG

10. Generate & print PDF report

Exporting and printing stored patient reports requires operator authentication and login through the Concussion Assessment and Patient Management pathway. Consult device administrator if needed.

• From the information hub, tap on the Menu button located along the bottom of the device

• Tap on Generate PDF Report from the options—the report will save to the SD card and will be accessible from a computer

• Connect a powered-on device to a Windows computer using the USB cable and navigate to the SD card

• Inside the folder labeled Assessment results, find the patient report named with PatientID-{id}-YYYY-MM-DD-HH-MM.pdf

• Copy over the PDF file, and treat as per protocol


Resources

1. Patient Selection

Initial Patient Selection Criteria:

Ages 18-85*            GCS 13-15           Injury within 72 hours

* BrainScope offers an EEG-based concussion assessment for pediatric/young adult patients aged 13-17

   Appropriate Patients       Not Appropriate Patients
  • Evaluating for CT referral
    • Can include patients under the influence of drugs/alcohol
  • Patients suspected of having a concussion
  • Patients taking blood thinners
  • Contraindicated for CT (pregnancy)
 
  • Abrasion/laceration where a sensor needs to be placed

Downloadable Resources

Assessments in the ED                  Results Guidance Template           

2. Clinician & Operator Education

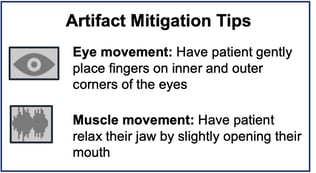
Tips for Successful Assessment:

 
Reduce noise and other distractions
Request patient to relax
Place patient in a semi-fowler (slight incline) position or in a chair with head supported
Instruct patient to imagine looking straight ahead with closed eyes
Direct patient to remain still during the test
Wait 30-45 seconds at the start of collecting before providing any coaching to the patien
Artifact mitigtation tips

On Demand Education:

3. Patient Education

Answers to patients’ frequently asked questions about BrainScope:

1.Why am I not receiving a head CT right away?

A head injury may cause injury to your brain including a bleed or a concussion.  Head CT scans are used to  assess brain bleeds, but cannot detect concussive injury. The BrainScope assessment will aid your clinician determine the need for a head CT scan.  

2. What is the Structural Injury Classifier?
The Structural Injury Classifier is an algorithm that uses brain electrical activity and selected injury information to determine the likelihood of being negative for brain bleed on a CT scan and identifies the need for further evaluation.

3. What is the Brain Function Index?
The Brain Function Index is an algorithm that uses brain electrical activity to assess brain function impairment. The algorithm scales with clinical severity to assist in diagnosing the presence and severity of concussion.

4. Are the BrainScope results reliable?
Yes. BrainScope technology has been extensively researched and validated and the algorithms and device have been cleared by the FDA. The technology was developed over 12 years of clinical research at a large number of sites throughout the US, has been described in over 30 journal publications and has been used on over 14,000 individuals

Downloadable Resources:

Clinician/Operator Talking Points                        Patient Results Tear Pad                        Concussion Guide

4. Community Awareness

Mild Traumatic Brain Injuries (mTBI) are often called the silent epidemic. Help your community better understand head injuries and what role your hospital can play in supporting their diagnosis and recovery.

Head Injury statistics

More than 7 million head injuries occur annually, many will be classified as a concussion
Concussions are misdiagnosed up to 50% of the time, and more than half of individuals will not seek follow up care
Lifetime medical expenses for patients with traumatic brain injuries (all severity levels) can range from $85,000 to $3 million.
Early diagnosis and intervention can lead to shorter recovery time
 

Ways to engage community

Recognize and celebrate Brain Injury Awareness (BIA) Month in March.
Invite local media to learn about your head injury initiatives and available technology
Use Community Newsletter to share technology and patient experience
Share patient stories on social media channels


Contact BrainScope for our Press Kit (template press release, images, brain health facts)